by Brad Hanson
| www.AlaskaFlyfishingOnline.com | |
|
|
|
|
by Brad Hanson |
|
|
|
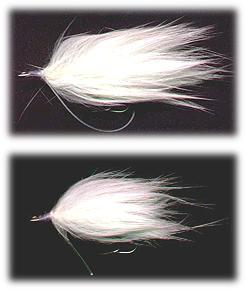
Because of the nature of fish and the areas we find them, we're often posed with encountering solid, immovable objects while presenting flies. Many of the food stuffs fish eat are found in and amongst the rocky substrate or wood debris of the stream bottom; and, because of their reclusive nature, and for protection, fish are often found hiding around deadfall timber, or beneath undercut banks and submerged tree roots. These conditions, while advantageous for fish, create unique presentation problems for anglers attempting to put flies within the fish's sight window. We often recognize these situations for what they are, and more often than not give the snag hazard a wide enough berth to save our flies, but just as often miss the opportunity to hook what may be the largest fish in the river. Tying any of our standard patterns in weedless versions gives the advantage back to the angler. Not only do well protected and concealed fish feed more freely, but they're less likely to have been pressured by other anglers working the same stretches of water. Anglers using the knowledge of these factors and weedless flies, turn the tables on wary fish, and will undoubtedly see an increase in not only their catch rate, but the average size of fish taken. Tying Steps
1 - Using tying thread, build a foundation along the hook shank extending well into the curve of the hook.
2 - Wrap monofilament fishing line, or tippet material rearward along the top of the hook shank with excess extending past the bend of the hook. Continue to thoroughly wrap the mono to the point where the thread foundation ended.
3 - Finish tying the fly pattern as usual, being mindful not to crowd the eye of the hook.
4 - Bring the excess mono forward, forming a loop that encircles the hook point. Tie off at the eye; whip finish.
The size and weight of the fly will determine the diameter and stiffness of the monofilament. In most instances, mono in the 1 - Tie desired fly pattern as usual, leaving slightly more space than usual at the head; do not finish.
2 - Immediately behind the eye, heavily wrap the monofilament to the underside of the hook shank with the excess extending rearward.
3 - Bend the mono where the wraps end, pulling the loose end forward until it's at a right angle to the shank. Make repeated wraps on the point side away from the eye to hold the mono in position.
Note: The mono will not generally remain at a right angle to the shank, but slightly angle rearward toward the point of the hook based on the amount of wraps built up. The excess mono should be trimmed to extend slightly past the point to deflect the fly past potential snags.
4 - Whip finish the fly as usual.
The size and weight of the fly will determine the diameter and stiffness of the monofilament. In most instances, mono in the Anglers who frequently fish in snag and debris choked streams will find that adding a weedless feature to other patterns such as baitfish, sculpin, leeches, and large nymphs like dragonflies will provide opportunities for many trophies that have never felt the point of a hook before.
|
 Loop Method: