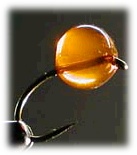
The hot-melt glue egg first appeared commercially as the "Moe Egg," and as far as egg patterns go, the hot-melt incorporates several element that make it an excellent fly. It's formed by applying an egg colored, hot-melt glue directly to the hook. The first thing people notice about this pattern is its realistic appearance, although its merits go deeper than the look. No only is it quick, easy and cheap to tie, but practically indestructible. In addition, the density of the material allows the fly sink, and tumble along the bottom where egg patterns should typically be presented.
 The downside to the glue egg is that even though there are a number of available colors, the lighter, washed-out patterns that closely imitate non-fertilize "dead" eggs can be difficult to imitate. I've done some experimentation with splitting different colored glue sticks, then running them through the gun. The results have been encouraging but not totally satisfactory. Another method I've been using for altering standard glue colors is to affix a small colored bead to the hook before applying the glue over the surface. This method has allowed me to achieve better color variations, but possibly more importantly places the entire egg on the top-side of the hook shank. This is important because with this method, the gap between shank, and the hook point, is not diminished by the egg material. The result is improved hooking percentage.
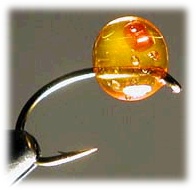 Another variation of the bead method is to use tungsten or brass beads, which not only add weight, but also a glint of flash that shines through the glue material. For those creative souls wishing to build a most realistic imitation, minute red beads can be placed in the formed egg to imitate the natural oil spot that newly deposited egg possess.
Another use for the colored hot-melt is to form the egg portion of the egg-sucking leaches and similar patterns. The appearance is excellent, but from a practical perspective, it adds durability by encasing the head in glue. It can also be used on the underside of the Alevin patterns to accurately mimic the egg sac.
The pattern has been proven to be an excellent producer much of the time, but like many good patterns, it’s not a stand-alone do-all for everything.
MATERIALS & METHOD
- The glue gun is a smaller version than the standard craft gun, but can be easily found at most fly shops, hardware and department stores for around 5 to 8 dollars. The dyed glue sticks come in 17 different colors, and are typically found only where fly tying materials are sold. Their cost is around 2 dollars per 4 pack.
- Hook sizes will be consistent with other egg patterns and usually be tied on a 3X short in sizes 6, 8 and 10.
- Bead size will be determined by the desired size of the finished egg. As a rough guide, use beads that are one-half the diameter of the finished egg.
Tying Instructions
- Because the hot glue is in a heavy liquid form when it leaves the gun, it will quickly sag or run until it begins to cool. To form a nicely rounded egg, the hook will need to be rotated to counteract the sag. Rotary vices work nicely, but holding the hook with hemostats or hackle pliers also works very well.
- While holding the hook with stats or another device, begin applying glue to the shank behind the eye while rotating the hook back and forth. It will become immediately apparent how this works once you begin. As you're rolling the hook and glue, it will begin to round and form the shape of the egg. When it has the proper shape, quickly dip the egg in a cup of water to cool.
- If by chance, you accidentally touch the egg to the edge of the cup before cooling, or for some reason it doesn't come out as symmetrical as you'd like, don't worry, it's easily fixed. Again, while holding the egg with hemostats, use a lighter waved under the egg to apply gradual heat. As it slowly begins to melt again, roll the egg back and forth to reform before cooling. It will take some practice to determine the amount of heat necessary to touch up the egg, but if all else fails, the egg can be easily removed with a knife for a fresh start.
Photos by B. Hanson ©2002